<< Back to Portfolio

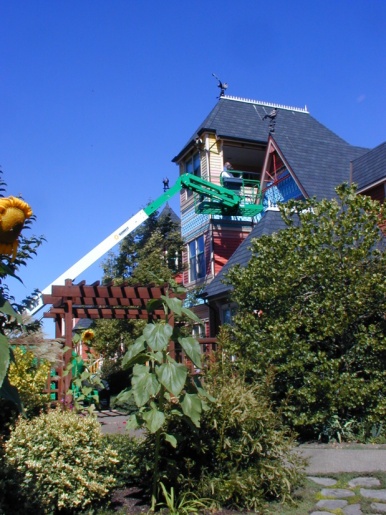
East Vancouver, across from the Portland airport, within sight of the mighty Columbia.

The arch-top wooden 2nd story doors seen in the previous photo with the Juliet Balcony have no protection from the elements.

And most all of us in this area know how the weather gets near the river not so very far the mouth of the gorge. The bottom-rail is toast on both doors. You can see better the telltale wavy-wood sticking that signifies the existence of water-damage (rot) if you click on the photo and enlarge it.

No, those are not true-divided lites. The muntins are simulated. Semi permanently adhered to the glass on both the interior and exterior sides. In the industry, we call this SDL. Simulated-Divided-Lites. So in reality, each door has only one insulated glass unit, even though the above photo showing the fogged-up glass makes it look like they are individual insulated units.

Back at our shop, the new bottom-rails are fabricated and installed. After weighing a number of options which we gave to our client, including the option of providing new doors, our client chose to have us replace the failed-glass, and the rotten bottom-rails, but to eliminate the SDL.

So the muntin grids were removed with the failed glass and the new tempered glass was manufactured while the glue had time to cure on the two repaired doors.

We replaced all the wood sticking that holds the glass to the doors.

After the new sticking was primed, it is carefully covered with masking tape, as is the glass and the door sash. The extensive masking serves two purposes.

It keeps the silicone sealant off the surfaces that will be painted, since silicone does not take paint, and it makes for a very professional caulking job. A proper caulking job includes applying just enough to achieve a certain degree of caulking oozing-out to ensure that all the seams and voids are filled between the sticking, the door sash and the glass surfaces beneath the sticking.

We use a special silicone caulking product that avoids the adverse reaction that can occur with the off-gassing of some caulking and the consequential degradation of the sealant (butyl) that seals the insulated glass unit. The point of course being that if the wrong sealant is used, it could cause further glass failure.

A previous client in Gresham. Now this may sound questionable to some, but we replaced these very same door assemblies in 2006.

This is one of two sets of doors we previously installed. And the original doors we originally replaced were wood doors that did not last long at all given the extreme exposure these openings endure. We had recommended Fiberglass doors as being more up to the task of enduring the elements, which is what we installed in 2006.

And, as it would happen, the Fiberglass doors had indeed weathered quite well. But as you can see by these photos, the jambs and the center mull-posts were NOT a composite material, and just within the course of the 6 or 7 years, this is what the extreme weather blowing in from the Columbia Gorge had wrought.

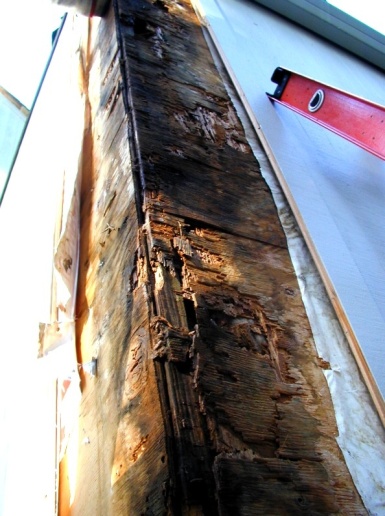
All of the vertical jamb legs were showing some degree of this phenomenon wherein the caulking seams had opened up, due to the expansion and contraction of the wood-jambs, which subsequently allowed moisture to access the end grain at the bottom of these hemlock products, resulting in what is shown here as well-entrenched rot. Note the wavy surfaces and the split. Note the brickmoulding pulled away from the jambs. This is what can happen to even well-painted wood that is consistently drenched.

Fortunately for us, our clients here were of the reasonable variety…able to maintain sight of the fact that we did not design or build the door-jambs, nor the architecture of the house that left openings so severely exposed. So once again, they employed us to make the necessary repairs.

As it would happen, the advent and availability of “composite” door jambs had greatly increased since we installed the doors in 2006, so we were able to rehang the Fiberglass doors into new composite jambs. Steve Hilt is shown here routing hinge mortises into the new jambs on-site in our client’s garage.

After which, the door assemblies are reassembled and reinstalled.

The masking-tape you see here is indicative of the measures we take to not only provide a thorough caulking of all exterior joints and seams, but an entirely professional looking caulking job as well. You can enlarge the photo for a closer look. There are no doubt caulkers out there who might be tempted to brag about how they don’t need masking tape to achieve a professional looking caulking job, to which we would likely say… “whatever.”

The masking tape allows us opportunity to “tool” (apply pressure to) the caulking, working it into the joints and seams instead of the caulking merely sitting on the surface. This practice generally translates into a degree of smearing the caulking. The masking tape, as the name suggests, “masks” that effect and keeps the application of the caulking looking uniform and professionally applied, as David Castro demonstrates above with great finesse.

Yes, it takes more time and effort to do it this way, but this is quite simply the standard of work we aspire to provide.
Our client now has both doors and jambs (door-frames) that are impervious to the elements. And yes, the exterior brickmoulding we provided and installed is also a composite product. This is the second set of doors upstairs, as you can tell by which side of the opening the operable door sits on.

Upscale duplex condo on Vista Avenue overlooking downtown Portland.

One of two back-deck single-entry exterior 8′ tall doors, both of which had damaged door jambs.

This is the other one. Both of these openings face northeast, which is to say that they faced the winds that so frequently blow in over Portland from the Columbia Gorge.

Although I’ve seen much, much worse weather-damage, and might have been tempted to offer to repair their jambs, our client was very “preventative-maintenance” minded and wanted it fixed before it…

…became any worse of a problem. As you can see, these original wood jambs were made of “finger-jointed” material, which is always a mistake for exterior applications, in my opinion.

There was also some damage from the storm-door on one of the openings being ripped off by the afore mentioned winds. There were also concerns that the thresholds weren’t properly installed and possibly allowing water penetration into the building.

So we replaced all the vertical jamb-legs with composite versions, which are of course, impervious to moisture.
We rehung the original doors into these new jambs, mortising for the hinges and the lock strike-plates on-site & re-installed the original exterior & interior trim materials.

We did of course, check the threshold configuration to make certain water was not penetrating into the house, and we installed self-adhesive flashing-membrane material over the rough-opening materials and tied it into the moisture-barrier so that our clients could sleep soundly at night no matter what northwest storms might be blowing through.

We did of course, check the threshold configuration to make certain water was not penetrating into the house, and we installed self-adhesive flashing-membrane material over the rough-opening materials and tied it into the moisture-barrier so that our clients could sleep soundly at night no matter what northwest storms might be blowing through.

A relatively modest home in South Burlingame with a front door facing southeast with near zero overhang. This small job is included here in our portfolio to illustrate two things: 1. No job is too small. 2. There are hundreds of these relatively small…

…projects that we do every year, the vast majority of which aren’t going to make into our portfolio, and yet they are really the bread and butter of what we do, because we do so many of them. The storm door being needed here is a no brainer.

But the storm door provides very little protection for the original wood-sill.

Same goes for the exterior wood trim. See that open-miter at the corner of the wood-trim? Every time it rains, water is cascading down this exterior wall and inundating that small opening, and you just know the water is being channeled somewhere it isn’t supposed to go.

So the storm-door is temporarily removed, the exterior trim is removed & the sill-nosing…that portion which had sustained some water-damage is carefully cut-off without disturbing the threshold assembly.

If you enlarge the photo by clicking on it, you may be able to see things a bit easier.

Our technician Bruce is prepping the replacement sill-nose and exterior trim for installation.

The new products are carefully installed, caulked and primed. You may want to enlarge the photo to see it better. Oh yes, we also ADDED Z-flashing over the top piece of exterior trim (not shown), as it should have had to begin with. This would have prevented water from accessing the open miter.

The storm-door is re-installed. A side-note would be that our client also had us replace her pneumatic storm door closer.

The only thing left is to clean-up the job-site.

The Barrington Heights development in West Linn.

The storm door protected the entry door, but not so much the jamb assembly.

The door and the glass, and most of the jamb assembly is fine.

We need only replace approximately two jamb-legs and the kent-sill at the bottom of the assembly.

All the trim materials are carefully and meticulously removed with the benefit of decades of practice.

The transom glass was left in place, but the sidelight glass we de-glazed before removing the jamb assembly.

One of our goals in showing some of these projects we have done in the past is to impress upon or prospective clients the expertise we have developed over the years.

Expertise in knowing a dozen different ways we can set up shops on-site if and as needed. It does not take a rocket scientist to understand how this can save money for our clients.

For example; Having the expertise to dismantle a jamb assembly, machine new components if and as necessary, reassemble everything and re-install the rest of the original components, often the very same day.

This is what we have been doing for going on three decades. And by golly, we are pretty good at what we do.

Northwest Portland, just east of Holman Park. Notice the lack of eves. We’ve been told that during World War 2, and for some time thereafter, a shortage of resources necessitated that architecture cut certain corners, resulting in the demise of such periphery.

An absolutely gorgeous front door. The naturally finished wood is exquisitely contrasted against the green siding. But the door panels have begun to expand and contract…translating into splits in the panels and various joints & seams opening up.

And the back door is even considerably worse. As the sunshine in this photo indicates, we have a southerly exposure on this side of the house, which is where the lion’s share of moist weather comes from in this valley.

The large panel on this door has begun to warp and twist so much that it has resulted in some of the exterior wood-stops popping off the door. The nails shown here were apparently installed to help keep the panel in the door.

An interior view looking up towards the top of the panel shows the cupping panel pulled away from the interior wood stop material. You may get a better view if you click on the photo to enlarge it.

It may be hard to see from this exterior view, but the top horizontal piece of exterior wood-stop material is bent outward as it reaches the corner of the panel, and this is from the pressure being exerted against it by the panel.

This is what happened to several other pieces of the exterior stop material that have already come off.
If you enlarge the photo, you may be able to see the BOW outward of the panel’s far bottom corner, where the nail is installed.

And so it was that we were employed to attempt a remedy. We brought out our trailer and forced the panel back into position long enough for newly applied wood-glue & fasteners to establish a substantial hold upon it.

The prognosis? Not good. If the wood doors were painted on the exterior, then you would at least be able to caulk (seal) all the seams and joints by which moisture will most assuredly otherwise continue to gain access to the unfinished portions of the various wood components, no matter how many coats of varnish are applied.

But sometimes folks simply have not the ears to hear such things when they’ve already spent a considerable amount of money to achieve a particular look…which is, however unwise, stunningly beautiful…for another year or two.

Even in this photo, you can see some of the water damage. You can also see the lack of protection that this door & sidelight assembly has.

Every time it rains, this assembly gets wet. Not too surprisingly, I developed my own axiom many years ago.

It goes like this; “If you have a wood door or window assembly that gets wet every time it rains, you will have problems no matter what.”

Yes, you can go out and caulk all the joints and touch-up the paint every year, and that might stem the major problems from getting very far…

…but for most folks, having to do that every year is itself “a problem.” Thus the axiom stands!

People sometimes ask me why the wood windows and doors in the house they grew up in never seemed to have any problems like this.

After Shot #1.

To which I point out that:

1. Much of the farm-house architecture of centuries past had wrap-around porches with substantial eves and overhangs.
2. The quality of the wood was no doubt substantially better. Tight-grained old-growth perhaps. Not so much nowadays.
3. And most everything was coated with LEAD until 1978 in the good old US of A. Toxic, yes…but it really worked in protecting of the exterior woodwork.

After Shot #3.

…quantity of prosperous Americans and wealthy foreigners who came here to live like Americans. And just about any new design that an architect could come up with in the frenzied competition to stand out from the crowd in the sunbelt areas worked pretty well there. Have you ever heard the phrase “Miami Vice Architecture?” These fads are not simply imagined.
But many of the new designs seemed to out-pace proper flashing techniques or proper “enforcement” of said techniques.

After Shot #4.

Remember the EIFS stucco problems & related lawsuits in these parts? Well it’s the same situation with non-stucco construction as well, only without the lawsuits. Perhaps because the repairs aren’t quite as expensive. Yet the ramifications from some of the ill-advised sunbelt architecture and building practices being used in the Willamette Valley where mother nature’s wetter inclinations test the work of every architect and general contractor, keeps our company busier than you might imagine.

Near Wallace Park in Northwest Portland.

No doubt, the original garage carriage doors that came with the home in 1934.

Despite the water damage shown here, these doors are in extraordinarily good condition for two reasons primarily. They face North & they’ve been painted with lead-paint all these years.

But the rotten divots in the bottom of the doors were beginning to let rodents gain access into the home. Steve Hilt is shown here employing the use of his Festool circular saw to notch the bottom of one of the two doors.

After the notch is made, Steve positions the new material for scribing it’s relationship to the door so has to know how it is to be cut to fit. This new material will be used to replace the bottom-rail and a portion of both outer stiles as well.

This procedure was employed on both doors. The new material is fastened by means of steel lag-bolts driven up through the new bottom-rail into each of the four vertical stiles, as well as horizontally through the lower portions of the original hinge & strike stile into the new material for extra lateral support.

The lag-bolts are countersunk deep up into the new material so as to facilitate the insertion of some dowelling material as Steve is shown applying above.

A little Bondo application where needed, a little sanding, a little primer and viola, newly repaired carriage doors.

Tim Afonin demonstrates the fine art of proper threshold application as he installs a Pemko 151D anodized bronze aluminum threshold, which was the only threshold we had in stock that was long enough for this 90″ + wide opening. We also installed a Pemko A372P Pile Weatherstripping on the bottoms of the doors that seats up against the top of the threshold when the doors are in the closed position.

The finished product. A new coat of paint, and these doors will be better than new.

Just north of Arlington Heights near the Japanese Gardens. A relatively modest “rental” among a neighborhood that quite frankly boasts some pretty classy real estate.

And speaking of what some would call classy…is the fact that this little place is outfitted with Pella wood-clad doors and windows.

Some would call them classy because they are among the most expensive high-volume-production wood-clad doors and windows on the planet.

Here we have an exterior shot of the damaged bottom-rail with the aluminum-cladding that many would have thought was going to make this door assembly bullet-proof…simply peeling-off.

Fast forward…after having boarded-up the opening…we have taken the damaged operable sliding-door back to our warehouse for repairs.

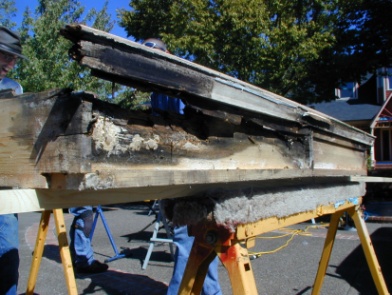
Technician David Castro is shown here examining the extent of the damage after the aluminum-cladding is removed.

To be completely honest, we see this type of thing almost every day. And Pella is but among a very long list of wood product lines that succumb to the Willamette Valley weather…clad…or not.

Here we have a shot of the original roller assemblies, which we like to point out consist of single roller chassis assemblies…not because this is unusual, but because we tend to pride ourselves in always trying to UPGRADE to something better.

David goes about the task of cutting out the damaged material.

And here we have a photo of the repaired bottom-rail upon the door set in our warehouse upside down. We apologize that this photo may be disorienting, but it really does show our double-roller chassis that have been installed into the newly repaired bottom-rails of this sliding door.

Lake Oswego, on the lake. The 2nd story master bedroom has three sets of very custom arch-top double-entry steel sash doors in wood jambs with Juliet Balconies.

As you can see from the first photo, these openings do not have any significant protection from the elements, so all the door assembly components are going to be seriously tested.

And even though these doors have aluminum interlocking thresholds with water-return weep-hole systems incorporated into their design, they are sitting on a wood sill, and the wood-sill’s sitting on…

…a steel-plate for reasons that must have something to do with the masonry structure of the house. As you can see by this photo, the bottoms of all the jambs had incurred some water damage.

So besides replacing the water-damaged vertical jamb-legs, we also replaced the original damaged wood-sills with pressure-treated versions, over the top of which we provided & installed new aluminum sill-covers, threshold-pans and new thresholds. We had these shortened samples cut and placed here to show our client a cross-section of the system we were proposing.

But before installing the pressure-treated wood sills, we covered the steel plates with a sill-pan of sorts, made of self-adhesive flashing membrane for extra protection against water penetration into the house, more separation from the steel surface for the wood-sill, as well as protecting the steel from the potential corrosive effects of moisture.

As a general rule of thumb, we do not like to cut-off the bottoms of jamb-legs and then splice in new material at the bottom as we see done by others. No matter how good of job you do, the differing pieces of wood are going to expand and contract at different rates, causing the seam to show back up eventually, making it look like the patch job it is. But the worst consequence of the patch job is that?

…discerning the extent to which the remaining original wood jamb material has been exposed to the strains of fungus that leads to rot later is much less than an exact science. Portions of the jamb that seem solid and unaffected at the time of the patch invariably grow rotten in another year or two. There were also two other upgrades that we provided to these three double-entry door assemblies.

The first was to create an effective weatherstripping system. This included kerfing the jambs and installing a Silicone compression weatherstripping for the top & sides. We also adhered a weatherstripping product down the strike-sides to seal-up between each pair of doors and installed surface-mount door-hooks on the door bottoms to interlock with the interlocking thresholds.

We also replaced all the insulated glass in these doors, for they had all failed. Believe it or not, these custom steel doors were designed for double-pane, insulated glass. The doors faced south, so we upgraded the glass to 366 Low-E glass. It was a fun job. Having an adjoining patio right off the 2nd story master bedroom, upon which to set up our shop certainly helped us in the logistical department.